Introduction
Realview NOW is an innovative web application
which provides the user a complete overview of his/her security applications
like iAlert Plus, CM Car Alarm and more. Thanks to the Dashboard, the user can get a detailed
view of all the integrated devices latest locations with a pin or a heatmap,
and also all of the latest alerts.
Sign up & Sign in
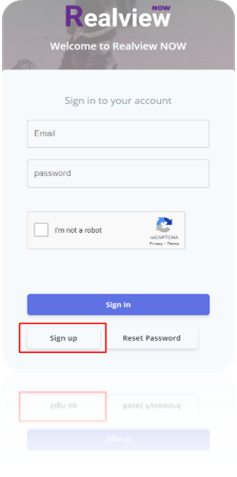
Sign up
By following this link www.realviewnow.net, the user navigates to the Realview NOW homepage.

After clicking the login button the user needs to create an account. To create an account, the user needs to click the “Sign up” button, fill all the necessary fields (Email, Password, Confirm Password) and also solve the Captcha to proceed.
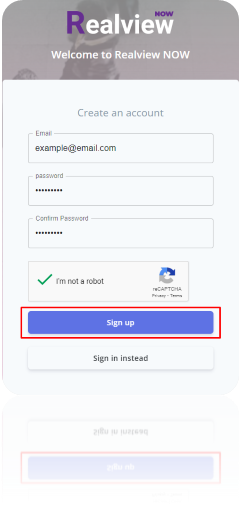
After
clicking the “Sign up” button that’s
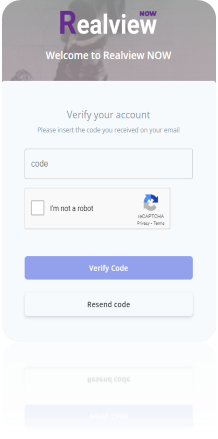
mentioned in the image above, the user receives a verification code via Email. If
the email is not received immediately, the user should also check the Spam/Junk
folder. This verification code must be filled in the next field in order to
continue with the account creation. Once again, the user solves the Captcha and
clicks on the “Verify Code” button.
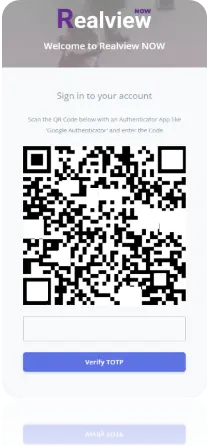
After the successful verification of the email and the verification code, a unique QR code is automatically displayed on the screen for connection with an Authenticator App.
For the final step, the user must scan the QR code using their mobile device through an Authenticator App, such as "Google Authenticator", "Authy", etc., and enter the generated code into the field in order to verify the TOTP (Time-based One-Time Password).
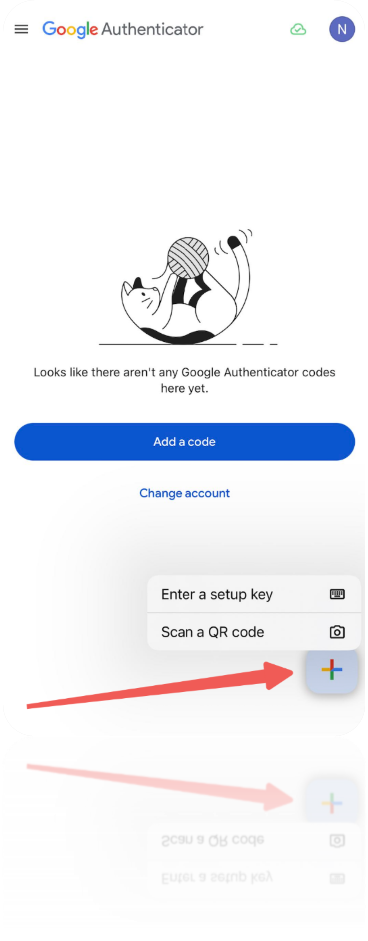
Using an authenticator app like Google Authenticator is straightforward. Simply open the Google Authenticator app, log in to your Google account, and click on the "Add a Code" button. Then, scan the provided QR code to link your account. If the account is for a company, ensure that the company’s device and email are used instead of personal contact information. This quick process enhances security with minimal effort.
Sign in
The procedure for the user to Sign in, is much simpler as he/she just needs to enter the email that was used for the Sign up and the password.
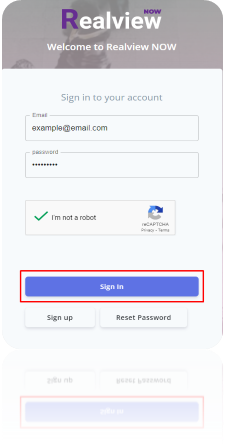
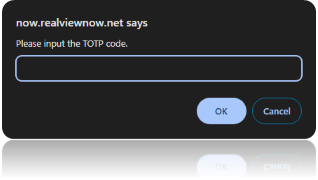
After solving the Captcha and clicking the “Sign in” button, the user needs to fill the TOTP code from the Authenticator App that he/she previously used, and click “OK”.
Getting started
After successfully signing
in, the user needs to purchase a subscription of any level that is best suited
for their needs from our e-shop. Once the subscription
has been completed, the user may verify that it has been activated by clicking
the “Check Activation” button and add a Device/Receiver by clicking the corresponding button to set up the Dashboard.
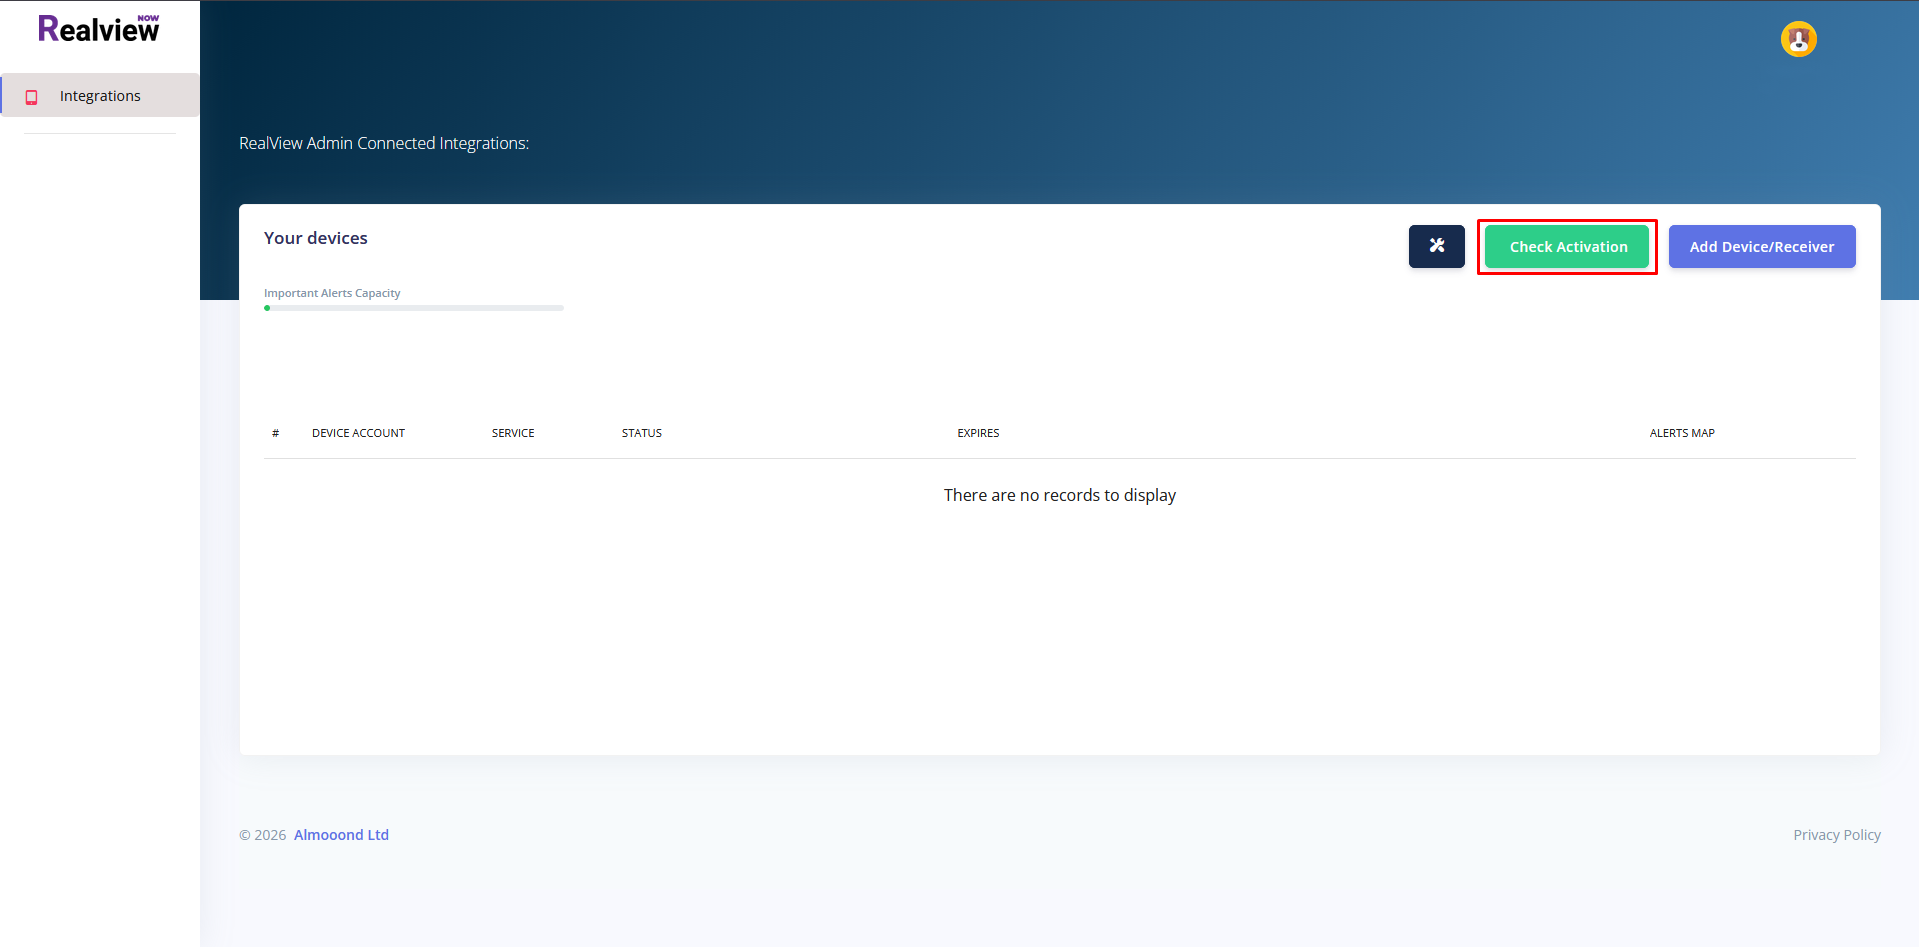
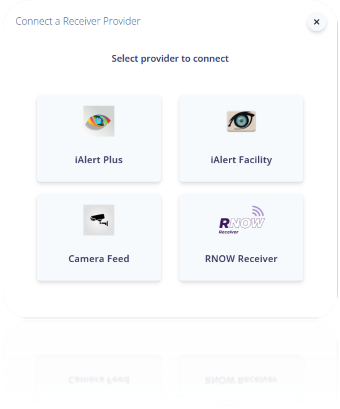
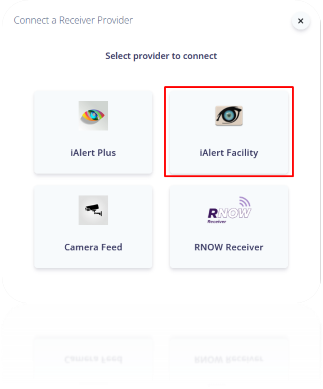
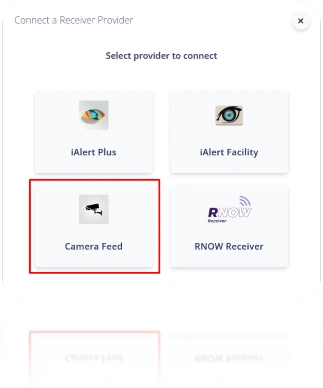
A window with all the available Receiver Providers appears, so the user can choose which one he/she wants to integrate.

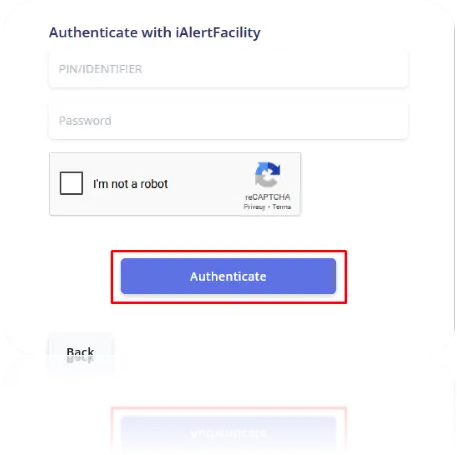
After choosing a Receiver, the user must enter the appropriate “PIN/Identifier” and “Password” and click on the “Authenticate” button.
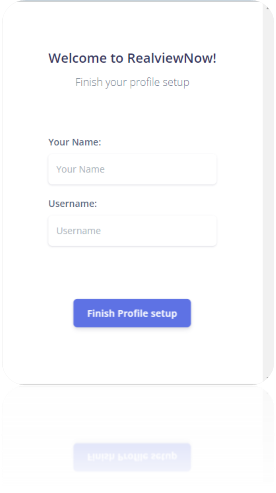
Finally, when the integration is done, a new window appears for the user to enter his/her Name and Username to finish the profile setup.
You can learn more about the iAlertFacility Integration by reading its user manual here: ENG / GR
Tutorial
After finishing with the profile setup, the user is presented with a quick tutorial of the basics with demo data, starting with the Dashboard Map. The tutorial can be skipped by clicking “X” or continued by clicking “Next” on the tutorial card that appears.
Here is a quick overview of the tutorial.
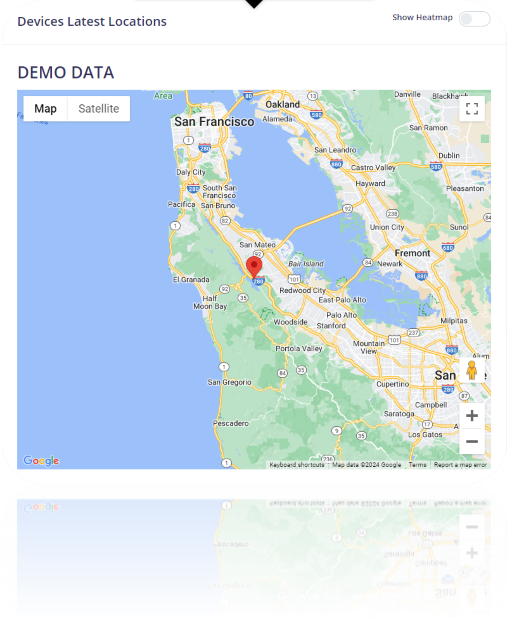
After the Demo Map of the Devices Latest Locations and the Latest Alerts on the Dashboard, the tutorial shows the detailed Alerts and the Devices page both of which will be covered later on, in this manual.
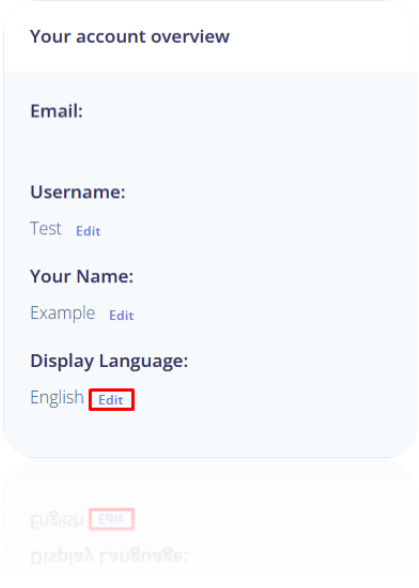
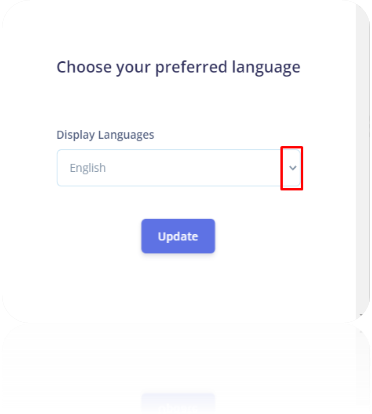
When the user successfully finishes with the Realview NOW account, he/she can choose a preferred language, with the default one being English. By navigating to the Profile section from the navigation bar at the left of the screen. From there by clicking the “Edit” button of the Display Language, a menu appears with all the supported languages, with the current available being English, German, Bulgarian and Greek.
Navigation Bar
The Navigation bar contains everything Realview NOW has to offer, helping the user to navigate through.
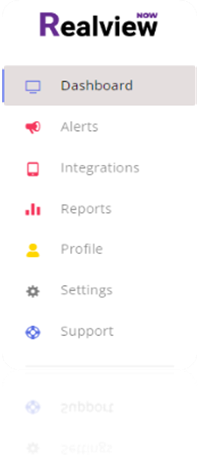
Dashboard
Provides information of the users’ account, like the latest locations of his/her devices, the latest and the important alerts.
Alerts
Provides detailed information of all the Receivers alerts, like “Service”, “Device”, “Signal ID”, “Alert Type” etc.
Integrations
Shows all the current connected integrations and lets the user add more or mark some as favorites.
Reports
Lets the user create a report of the devices he/she wants and export it as a “.csv” or “.pdf” file.
Profile
Displays the users’ information with the ability to edit some basic profile info, upload a profile photo or choose a profile icon.
Settings
Allows the user to restart the tutorial, change password, request data and delete his/her account.
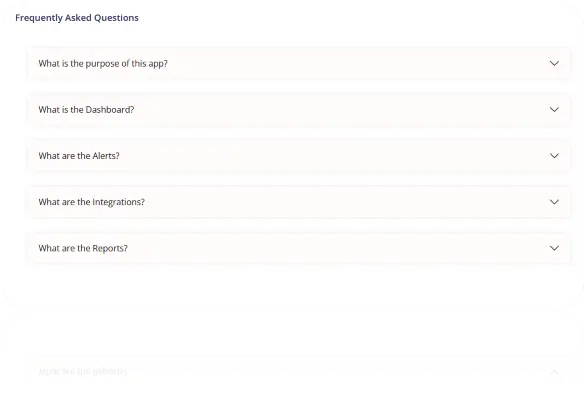
Support
The user can communicate with us for a specific question or matter by sending a message or have his/her question answered by the Frequently Asked Questions tab.
Dashboard
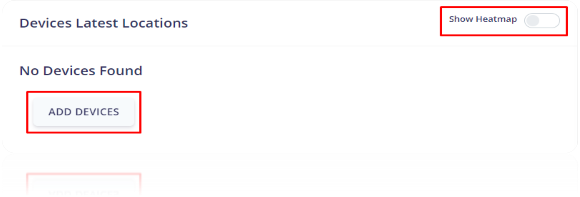
As mentioned previously at the tutorial section, the Dashboard displays the users’ account overview. After integrating a Device/Receiver, its latest location will be present in the “Devices Latest Locations” window and the user can toggle a heatmap from the corresponding switch for each of the devices.
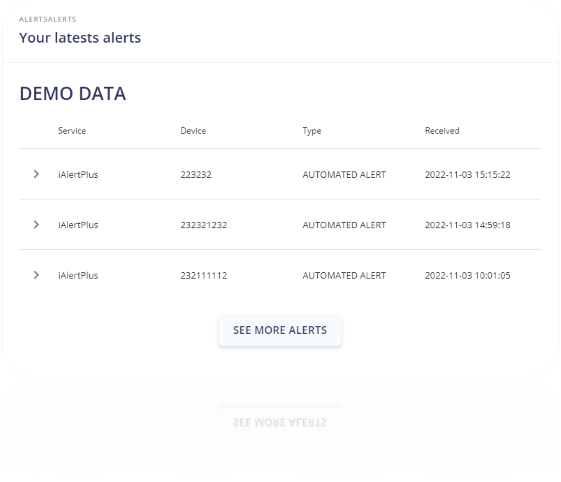
The Dashboard also displays the latest alerts with detailed information, about the “Service” that gave the specific alert, the “Device” used, the “Type” of the alert and lastly the date and time that the alert was “Received”. There is the option to also enable the auto-refresh toggle switch in the table, which refreshes both Latest & Important Alerts tables every 5 minutes. The Dashboard Map displays the alerts from the current page of the Important Alerts table. If there are no important alerts, it instead shows the alerts from the current page of the Latest Alerts table.
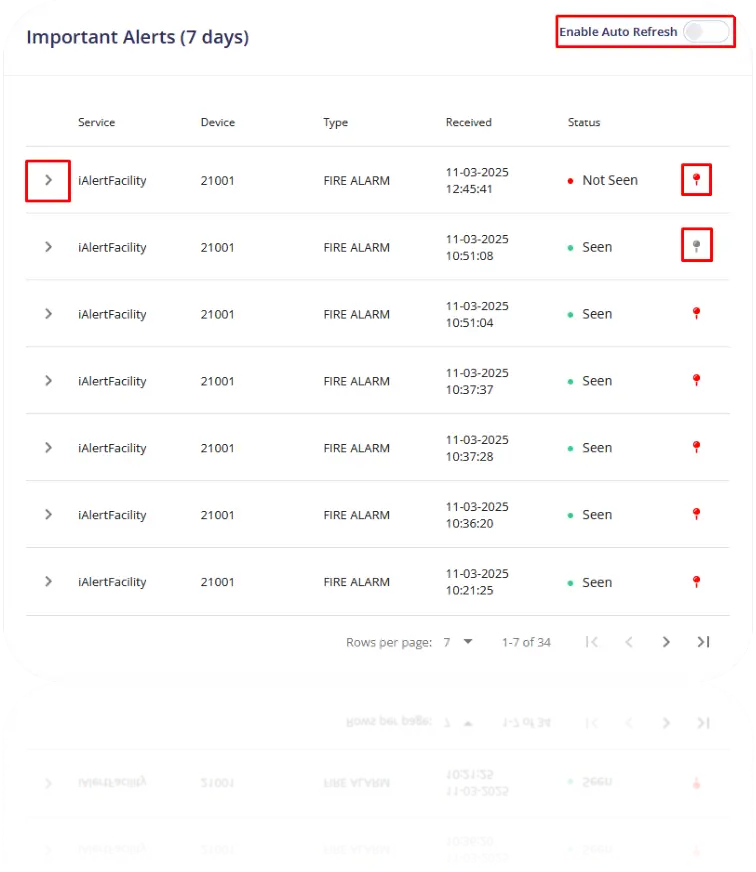
In the Important Alerts Table, the user can control the auto-refresh of both tables, and also can manage the alerts visibility in the Dashboard Map with the pin icon for each alert. If a pin is red the specific alert is pinned and visible on the map with its own marker, if the pin is grey the specific alert is not visible, as shown in the image above. When a new alert appears, a notification sound will start playing to notify the user until the alert is marked as Seen, by clicking the arrow button. The notification sound can always be muted by the browser tab.
Note: Due to browsers policy the notification sound might not be audible if the user hasn’t interacted with the webpage. This issue can be resolved by clicking, navigating or enabling the auto-refresh functionality.
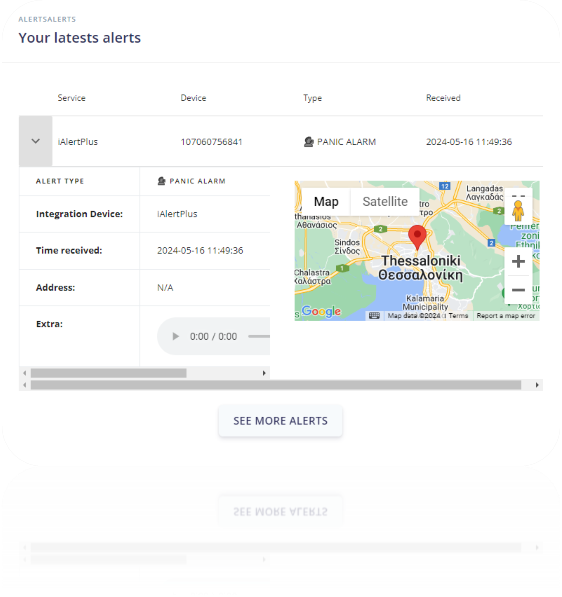
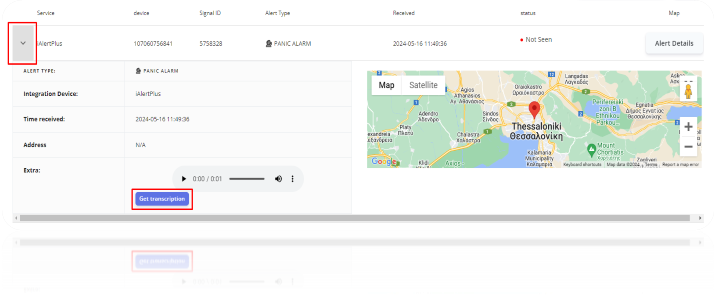
Furthermore, the corresponding arrow button provides the user with the exact location of this alert when it was triggered, and based on the Integration Device used, in this example iAlert Plus an “Extra” voice message is received from the moment of the alert. Lastly, by clicking a marker in the map the user can see some extra details of the alert such as “Time received”, “Alert Type” etc.
Alerts
The Alerts tab is specifically designed to store all of the users’ alerts in detail, as mentioned before with the necessary fields and a status indication marking it as “Seen / Not Seen”. Also, it allows the user to filter them by “Service” or by “Device Account” and customize the length of the current page by selecting the desired rows per page.
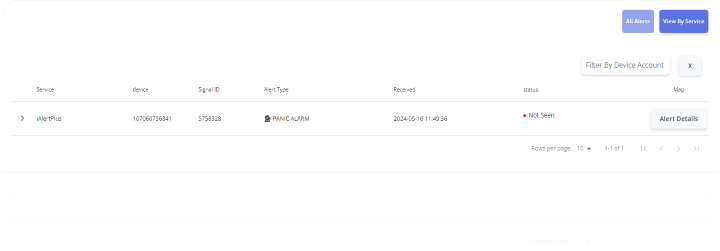
By expanding each alert it marks it as "Seen", and besides the pinpoint location, the user also has the option to get a transcription of the voice message if there is one.
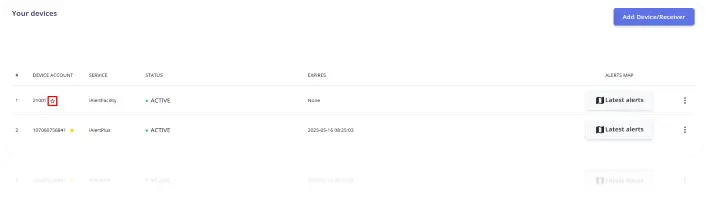
Integrations
The Integrations tab is vital for the functionality of Realview NOW, as it allows the user to add his/her Devices/Receivers, keeping them grouped in one place. It provides details for each device, such as “Device Account”, “Service”, a status indicator showing if the device is “Active / Not Active” and lastly the datetime of Expiration for the PIN.
iAlertPlus
iAlertFacility
To integrate an iAlertPlus device the user needs
to enter the correct PIN and PASSWORD that he/she received via email after the
purchase from our eshop.

To integrate an iAlertFacility device the user
needs to enter the correct PIN and PASSWORD that he/she received via email
after the purchase from our eshop.
Camera Feed
Before you begin, ensure that these are available:
- An SD card and an SD card reader connected to your computer.
- Raspberry Pi Imager (the installer for Windows or the equivalent for macOS / Linux).
- The PIN & PASSWORD of the Raspberry Pi and the PIN & PASSWORD of the cameras, which are sent via email after purchasing a subscription from our eShop.
- A suitable USB-C power cable for the Raspberry Pi.
- The local IP addresses of your
cameras (available in the camera settings or in your router’s management
panel).
Step
1 – Controller Integration
To integrate a Camera Feed device the user needs
to enter the correct controller PIN and PASSWORD that he/she received via email
after the purchase from our eshop.
Step 2 – Software Download
The user must download the latest software version for the Raspberry Pi from the URL provided in the email.
|
⚠ Note: The file is approximately 2.6 GB. Make sure you have enough disk space and a stable internet connection before starting the download. |
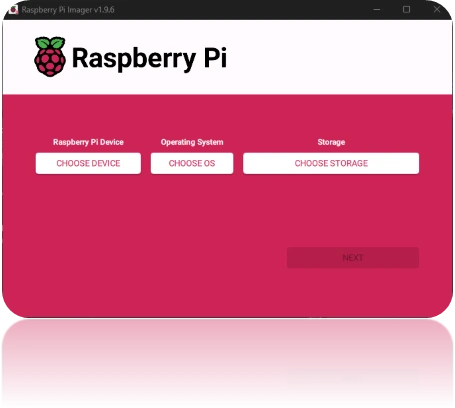
Step
3 – Write the software in the SD card
Open Raspberry Pi Imager. Under Raspberry Pi
Device, select your Raspberry Pi model. Under Operating System,
choose the last option called Use custom and locate the file you downloaded
via the URL provided in the email. Finally, under Storage, select the SD
card connected to your computer via the card reader as the target and click
Write. Wait until the Writing and Verification processes are completed.
Step 4 – Raspberry Pi boot
Once
the process from Step 3 is complete, insert the SD card into the Raspberry Pi,
connect the power cable, and turn on the device. Wait approximately 60–90
seconds for the boot process to finish.
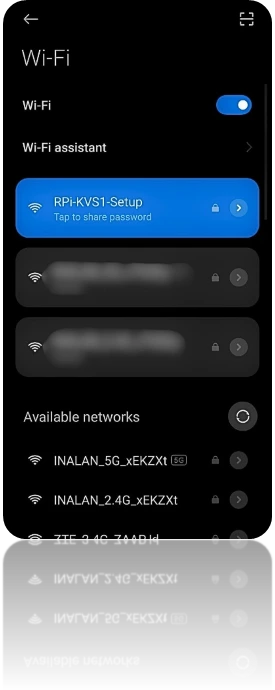
Step 5 – Connect to the Raspberry Pi Hotspot
Turn on Wi-Fi on your phone or computer and look
for the new hotspot created by the Raspberry Pi. Connect using the password: alm-adm1n
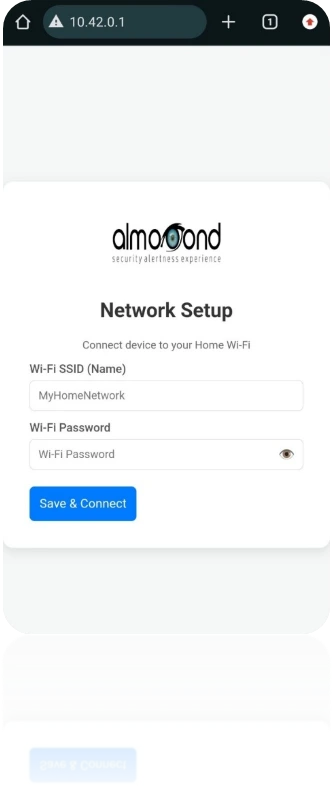
Step 6 – Configure Wi-Fi via Hotspot
After connecting to the
hotspot, open a browser and go to 10.42.0.1. Enter the SSID and
password of your local Wi-Fi network so the device can connect to the internet.
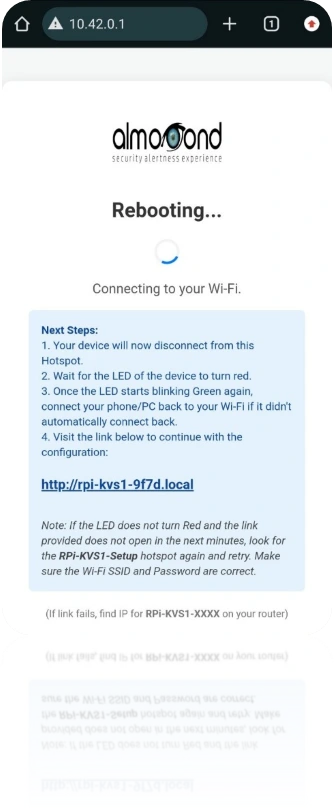
After submitting, you will see a reboot message as the device connects to Wi-Fi. Follow the steps shown on the screen:
- Your device will disconnect from the hotspot.
- Wait until the device LED turns red.
- When the LED starts blinking green, reconnect your phone or computer to your Wi-Fi network if it didn’t reconnect automatically.
- Visit the link shown on the screen (http://rpi-kvs1-XXXX.local) to continue.
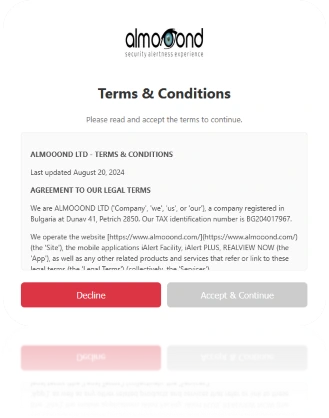
Step 7 – Accept Terms and Conditions
Open the local URL from Step 6 in your browser.
Read the Terms and Conditions and click Accept & Continue to
continue.
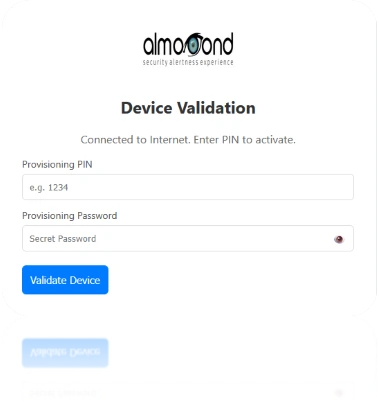
Step 8 – Raspberry Pi Verification
Enter the PIN and PASSWORD of your
Raspberry Pi (sent via email after purchasing your subscription). This allows
the device to complete the verification check and register with the AWS
Greengrass infrastructure.
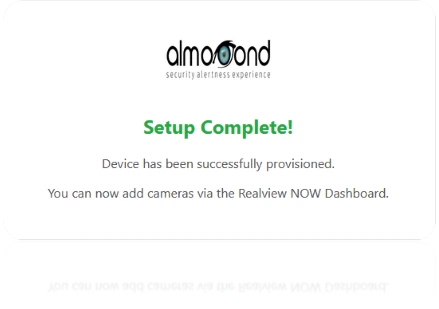
Step 9 – Setup Complete
Once your credentials are verified, the device will configure itself automatically.
A confirmation message will appear:
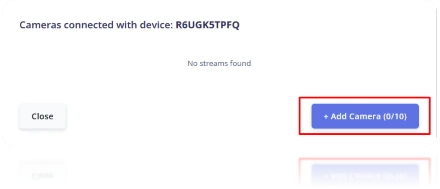
Step 10 – Camera Integration
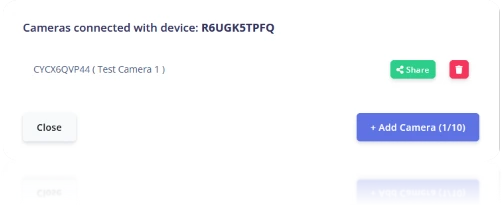
After
successfully integrating the Raspberry Pi, you will be able to see it in the
Integrations table with the status “Connected with 0 cameras” and an Edit
button.

By clicking the Edit button, the
following window will appear. Clicking the + Add Camera button opens the
form with the required fields to add a camera.
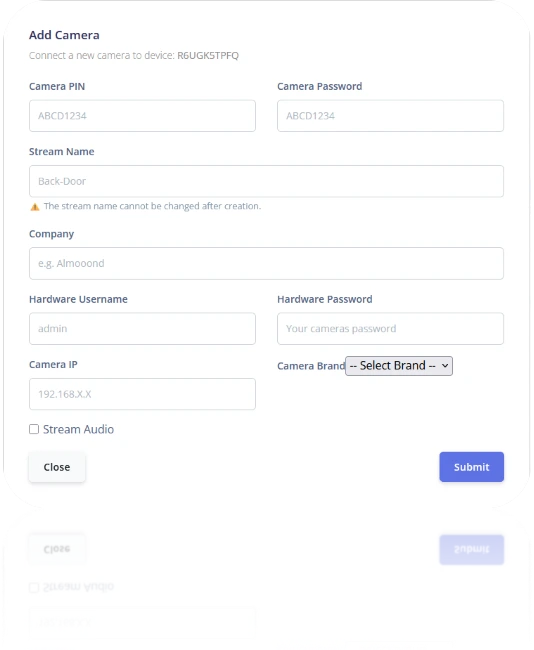
Step 11 – Add Camera Form
Fill
in the required fields for your camera, including the local IP, PIN, and
PASSWORD (both from your email). Click Submit when finished.
|
⚠ Note Choose the stream name carefully, as it cannot be changed after submission. |
After submitting the details, the camera will
now appear as connected to your Raspberry Pi.
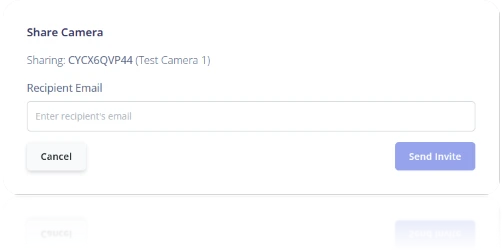
Using the Share button, you can share a
camera’s stream with another Realview NOW user by entering their email
in the corresponding field.
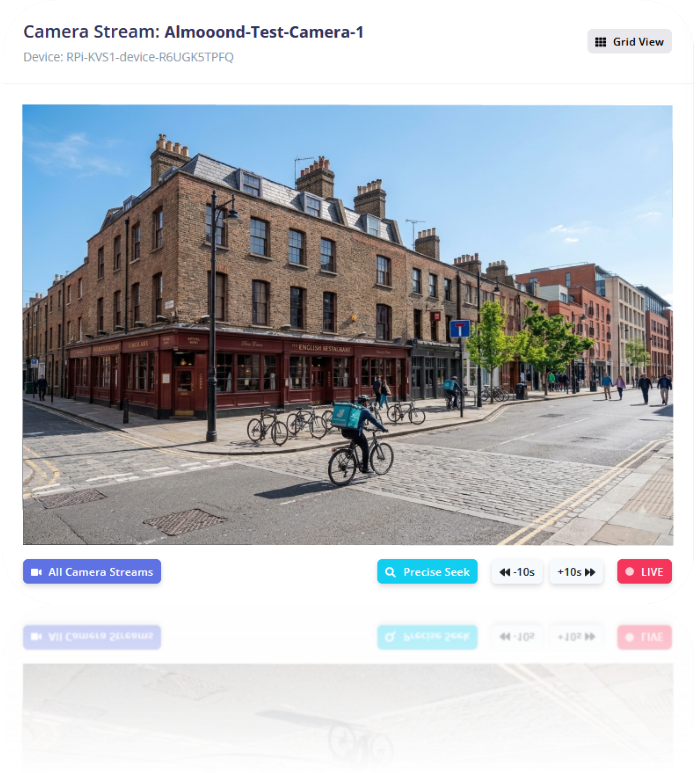
Step 12 – Watch Stream
Go to the Realview NOW Dashboard. Within a few minutes, your camera’s stream will appear, allowing you to watch in real time.
|
ℹ Info If the stream does not appear after 5 minutes, verify that the camera’s IP address entered in Step 11 is correct and that the camera is active and accessible on your local network. |
The user can also mark a device as favorite, by clicking the star icon. This will bring the selected alerts of the favorite device in the Important Alerts table in the Dashboard, making them easier to monitor.
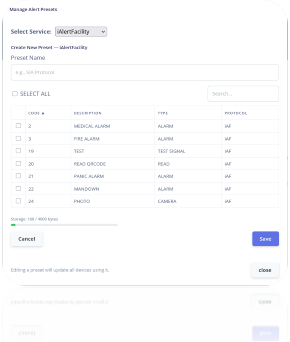
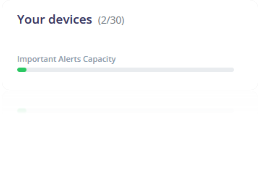
The Important Alerts Capacity indicator provides a visual representation of the current number of important alerts in relation to the maximum allowed threshold. To ensure optimal performance and avoid exceeding this limit, presets can be utilized to control and filter which alerts are marked as important. By properly configuring these presets, the total number of important alerts can be maintained within the defined capacity.
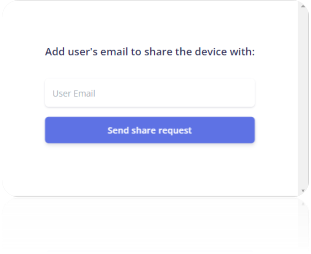
By clicking the 3 dots the user has two options:
- Share Device
- Remove Integration
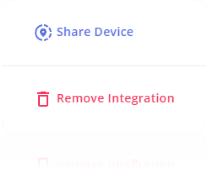
If the user wants to share the device, he/she needs to provide the Email of the recipient’s user and click on the “Send share request” button.
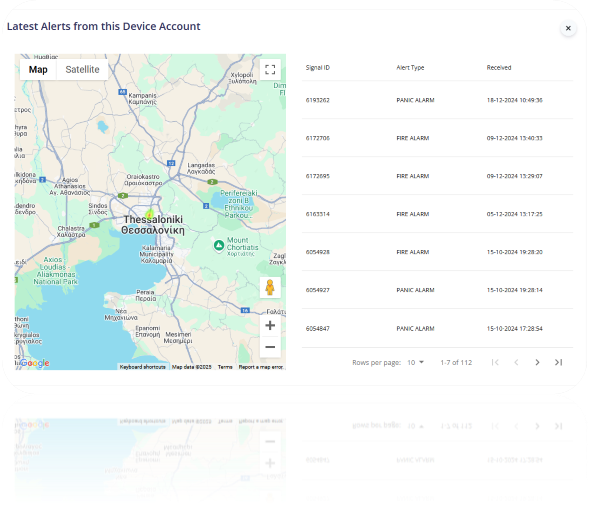
By clicking the “Latest Alerts” button, the user can get a heatmap for the latest alerts of each device, as well as the “ID”, “Code” and the datetime of when the alert was received.
Reports
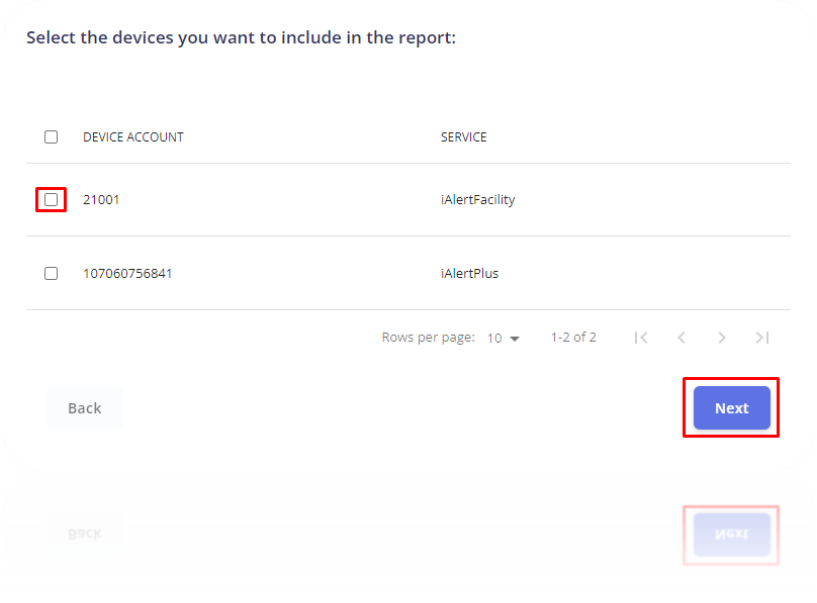
The Reports tab is responsible for creating a report in 3 simple steps:
Step 1 – Select Devices
The user can select one or multiple of his/her devices, by ticking the check box to include it in the report, and then click “Next”.
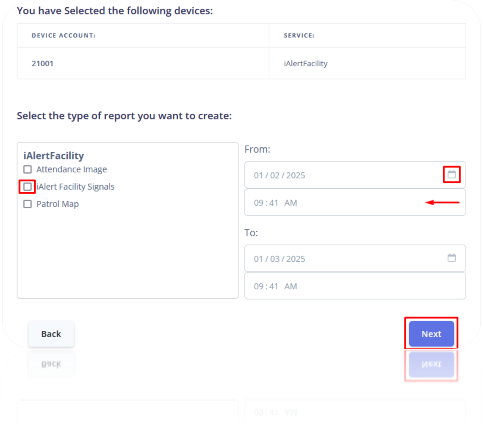
Step 2 – Select Type
In this step the user is presented with a list of the devices that were chosen, and the options to select the type of report that he/she wants to create for a specific date and time. After that, clicking “Next” will lead the user to the third and final step. The appearance and functionality of the date and time input fields may vary slightly based on the browser being used. This variation is due to browser-specific design and behavior, but the functionality remains consistent across all supported platforms.
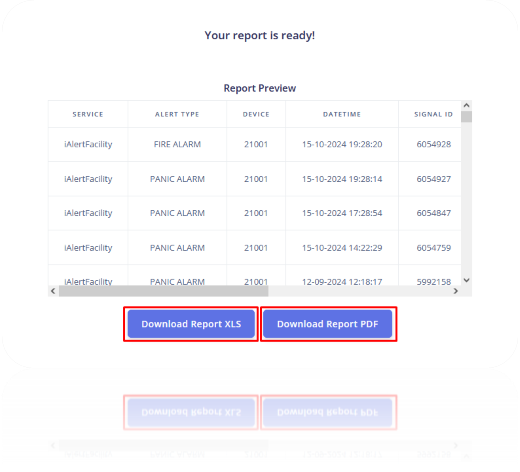
Step 3 – Export
All that’s left for the final step is to download the report. The report is saved as a “.csv” or “.pdf” file locally to the users’ PC.
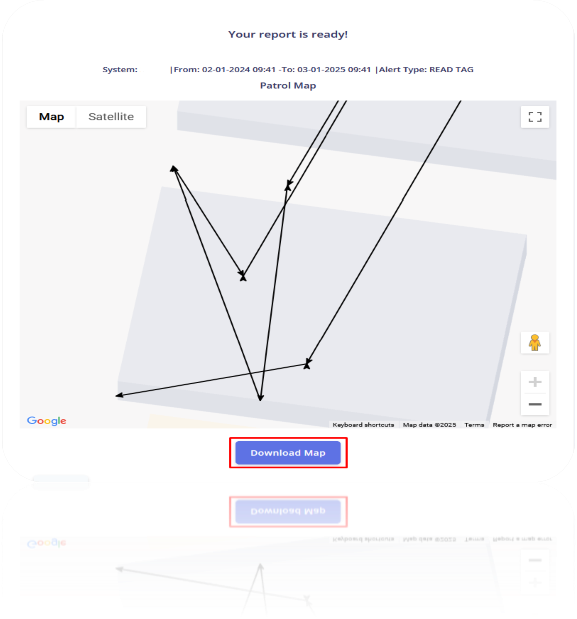
Or if the selected report type is a Patrol Map, the user can download it by clicking the Download Map button.
Profile
The profile tab gives the user the ability to edit basic information of the account. It consists of three cards, the Account Overview, the Profile Image and the info About our company.
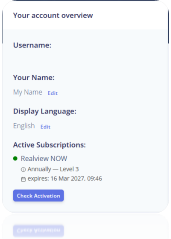
In the Account Overview
card, the user can see the Username
and current Active Subscription. The user can also edit the Name and Display Language by clicking the corresponding “Edit” button.
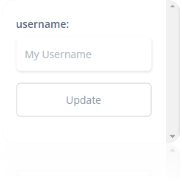
The user then types the new Username for example and clicks on “Update”, to save the change.
The procedure of editing the Display Language is the same as the one the user did after finishing the account setup.
For the profile image, the user has an option to either upload a custom one from his/her device or PC, by clicking the “Choose File” button, finding and selecting the desired image and then clicking on the “Upload” button to save the change,
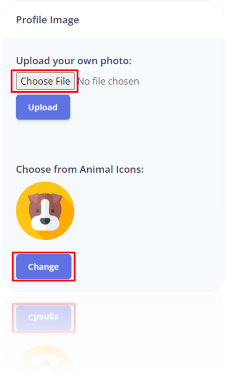
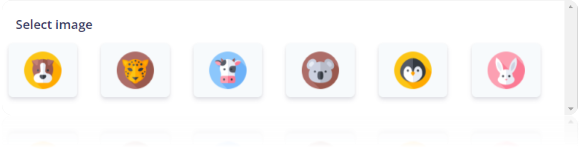
or to choose one from the existing Animal Icons, by clicking the “Change” button and then selecting the desired one.
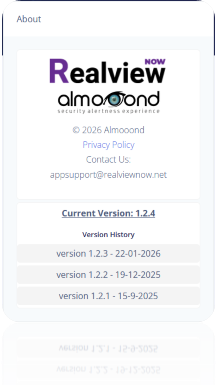
The About card has a detailed view of our Privacy Policy, the current version and version history of Realview NOW,
as well as a contact Email. For more information about contacting us, please
see the Support section.
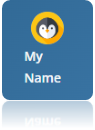
Lastly, the Profile icon is always visible on the top right corner of each tab, and when clicked, a menu appears which gives the user the ability to navigate to the profile section or to “Log out” from the account.
Settings
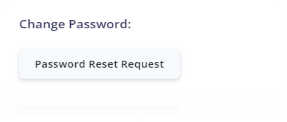
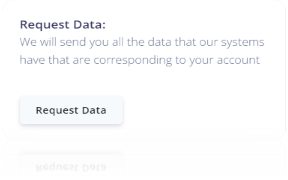
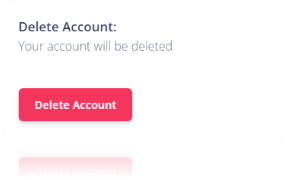
The settings tab consists of four cards: Onboarding Tutorial, Change Password, Request Data and Delete Account.
From the Onboarding Tutorial card, the user can click on “Re-Start Tutorial” button to go through the tutorial that was mentioned previously.

From the Change Password card, the user can click on “Password Reset Request” button to change the log in password for the account.
From the Request Data card, the user can click on “Request Data” button to make a request to receive all the data that our systems have that are corresponding to the users’ account via Email.
From the Delete Account card, the user can click on “Delete Account” button to delete his/her account from our systems. This operation is irreversible.
Support
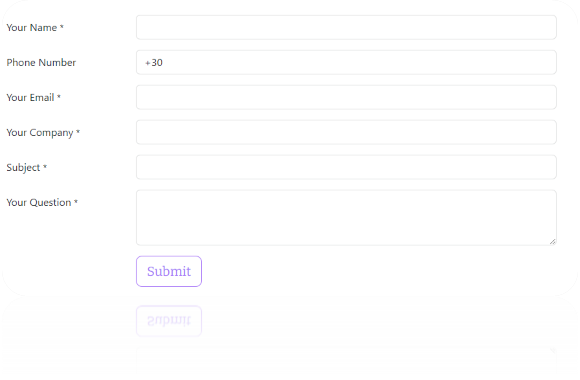
In the support tab the user can contact us about anything related to our company or services, by clicking the “Send Message” button,

Which leads the user to a form where he/she can ask us a question after filling in all the necessary information and then clicking “Submit”.
It is recommended that the
user first check the Frequently Asked Questions before contacting support. If a
question is relevant to theirs, an answer can be provided directly by clicking
the down arrow.